Tuesday, May 7, 2013

Easy & Effective Detox Bath!

As most of you know your body carries toxins, heavy metals, chemicals, & radiation. Detox Baths help naturally remove them.

I also felt the "disgusting toxins" being released through my feet/legs. It was strange yet cool. lol

*Your bathtub should be clean.
**It should be filled with unchloronated filtered water as hot as you can stand it comfortably.
(if you don't have access to filtered water add 2 tablespoons of Hydrogen Peroxide)


1.) Fill your tub with hot unchloronated water.
2.) Add 2 cups of baking soda to neutralize acids of the toxins. 
3.) Add 2 cups of Epsom Salts to water. It will help draw toxins out of the body. 
(If you have a rash or open cut, the salt will sting)
4.) Add 1 cup apple cider vinegar to bath 
(OPTIONAL!!! This will help cut bacterial, bladder or vaginal infections. It will also soften skin)


Soak in the water for about 30 mins.


*****Rinse off with water only as you do not want to put chemicals from soaps into your open pores/detoxed skin.*****


Here's my picture:
Top Left: Before      Top Right: After      Bottom: During!
It is also very important that you drink lots of water when you do this to stay hydrated. I got a slight headache after for about 10 mins because I didn't drink water like I should have. :/


-Happy Detoxing-


Friday, April 26, 2013

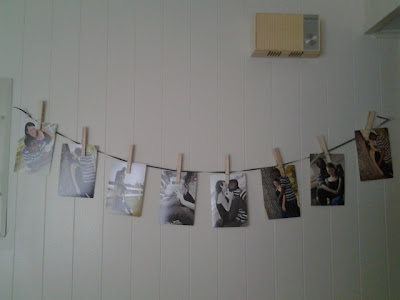
Frugal Friday #3: Displaying Pictures


It's no shocker that my husband is a Marine. It's also no shocker that military don't make as much as Hollywood claim they do. What is a shocker is how they make housing look like college dorms (ok not that much of a shock), But unless you buy a house or pay out your entire BAH and then some your stuck with a blah house.

We got our pictures done by a fellow Marine's wife. Now I've seen the idea floating around the interwebz and apparently, I'm the only one who doesn't want  "floating clothespins and pictures" on my wall! I decided to add a pop of color instead of the "fishline" look.

All I did was:
 1.) Tie the ribbon on each end to a thumbtack.
2.) Stick them in the wall, I gave mine some slack just so it'd "droop" a little lower.
3.) Hang your pictures and enjoy (:

*If your like me and haven't had clothespins laying around since the 90's, you can find them at dollar tree!*

-xoxox brandi-

Friday, March 8, 2013

Frugal Friday #2 DIY Scrub Free Stove-Hood Cleaner

 Nasty Right? What's even nastier is that this was sitting above where we cook our food =0
I'm OCD about my food and won't eat at certain restaurants so imagine when I looked up while cooking and saw this!


If your like me and are grossed out easy (and hate hardcore scrubbing) use this little trick to make it like brand new.

Here's what you need:

Large pot of water & 1/2 cup of baking soda


Here's where its optional and really up to you, If your pot is big enough for the filter to fit in then you can dip it in the pot (and dump it outside to save your drain) OR if your pot isn't big enough you can use something else. (I had to use the bathtub) 

Ok so once your water is boiling SLOWLY and I mean SLOWLY add the baking soda. It will fizz up but quickly settles. 

Then dip and hold (or poor it over the filter) and be amazed at the nastiness you've been cooking under. 


Once  it has sat for a little bit (the water cools) you can rinse with hot water, shake most of the excess water off and put it back in the stove hood to air dry. 
IF
Your using the pot method then hold it for about 3-5 mintues each spot then rinse with hot water when your done.


Mine was stained so it doesn't look brand new but if you still have build-up on yours, you can repeat the entire process and it should get it completely off.
(:

Happy Cleaning (:

-X0X0X Brandi-

Friday, February 22, 2013

UPDATED: DIY nail polish rack

I did this awhile back and somehow the pictures on the blog went missing soooo....here it goes again!


What you need:
3 foam boards (Dollar Store $1, Wal-Mart)
Razor Knife or Box Cutter
Ruler
Pencil
Hot Glue Gun

Optional Supplies:
Nails
Paint
Fabric
Whatever you want to decorate it with.
(Spray Paint will eat through the foam.)


Take your first board and with your ruler and pencil draw a horizontal line every 5 inches.

Take your second board and cut out 6 2” horizontal pieces and put aside.

With the rest of the second board, cut out 6 1” horizontal pieces and put aside.

Take your third board and cut out 2 2 ½” vertical pieces and put aside.

I chose to cover some of the pieces with fabric.


Take your 2” pieces and glue them along the lines made on your first board. The last piece you should glue along the bottom edge of the board.

Make sure to glue along the top and bottom of the shelves as well.


You will take the 1' pieces and glue them on the front, It will creates a barrier to stop the polishes from falling off.

Finally, Glue the side pieces on and your done!


My finished wall rack!


It will hold about 90 polishes!
 Some choose to re-enforce the shelving part with nails. 

Happy Building (:
~XOXOX Brandi~


Friday, February 15, 2013

Frugal Friday #1 DIY Grout Cleaner

So since I'm a makeup/nail polish junkie and also a wife and mommy, My dollars have to stretch. In order for me to splurge I have to cut costs else where. So every Friday I'll be sharing one of my tips or tricks!


Here goes the first one!


This was pinned on my pinterest a while ago, But looking at the grout throughout the house and remembering what it looked like brand new I was digusted.

This recipe is SAFE FOR CHILDREN & ANIMALS though it might leave them with a disgusting taste and smell (lol)


Recipe:

7 cups of water
1/2 cup baking soda
1/3 cup lemon juice
1/4 cup vinegar


So my squirt bottle was not big enough to hold all this liquid and im not gonna lie I winged it, no measurements at all. lol

 *let it sit for on the grout for about an hour & then scrub your heart out!*


THIS IS BEFORE!!!


AND THIS IS AFTER!!!!


It still worked AMAZINGLY and I'm gonna have to do it a second time because it was so damn disgusting. I actually wanna give myself the parent of the year award for allowing the kids continue using the 5-10 second rule. haha oh well!


~xoxox Brandi~
P.S. We may just be eating dinner off the tile tonight!
(totally joking)